Thursday, November 25, 2021

2020 Thanksgiving

Turned some Jacks around, added an inflatable turkey, and painted/glittered "Give Thanks" on the back of the singing pumpkins.


The seams that are visible are PVC pipes that is bolted to the plywood. Rebar that has been pounded into the hay is inside the pipe. 


Halloween 2020


2020's graveyard is a success in the new yard.  ATMOSFX's Jack-o-Lantern Jamboree was added. Three quarter inch pumpkins were created to use as a screen for the projection. A Mira Culous Dae tombstone hides the projector. The RIP in the front of the base acts as a vent for the heat. The other new tombstone is Cara Mel Apple. Both were covered with Exterior Foam Coat. It worked as promised. The tombstones are very strong; almost stone-like, but they are heavier than expected. Also, the finish is more sand covered than smooth. 


Three new Jack-o-Lanterns were carved by family and friends.  The stack of three jacks that I found at a thrift store were pained with new orange and black glitter was glued in the eyes and mouths. 


The fogger worked for one night. A new pump has been ordered; hopefully a how to replace a fog machine pump is coming. 


The trunk stopped working. A brace was added to the lid to give the armature a place to attach and make the lid open more. A short string of cool white lights was moved from the treasure level to inside the lid. Warm white lights will add a more golden light.

Tuesday, March 26, 2019


Easter Garland


Lit Easter Egg Garland

Here is a great way to spruce up your eve for Resurrection Sunday.


Easter Egg GarlandThis garland simple to make. I used a string of white LED lights that have a crystal cover that pops off, shiny Easter garland and plastic eggs.


I Dremel-ed a quarter inch  whole in each egg, popped the crystal off the light, poked the LED through the whole then snapped the crystal back on.


Then I wrapped the garland around the length of the wire and hung it up.
All content and information I present on this blog is intended for entertainment only and is presented “as is”, without claims or warranties of any kind, express or implied. I am not an expert of any kind; I just figure out how to make and create projects and I am willing to share that information. USE THIS INFORMATION AT YOUR OWN RISK! USE OF THIS INFORMATION CONSTITUTES AN AGREEMENT BY THE READER TO ASSUME ALL RISKS! The reader’s interpretation and application of this information shall be the reader’s sole responsibility. The reader agrees to hold harmless the author and publisher and therefore in no event shall the author or publisher be liable to the reader or any third party for any damages, claims, expenses or other costs; including, without limitation, legal fees arising from or in connection with the use of this information. The reader further agrees that their sole and exclusive remedy is to discontinue use of this information. I hold the copy right to the content if this blog and it may be used only with my permission. Your personal or contact information will not be shared with anyone, by me. I am not responsible for what the publisher or any of its partners do with your information. I reserve the right to change, close, sell or change the terms of use for this blog at any time. I am not responsible for any of the behavior or products presented by advertisers or sponsors in connection with this blog. If you wish to ask a question you may email me, however, I check my email about four times a year so a comment may work better. Please understand that any comments or emails sent become my property to use as desired.


Saturday, January 5, 2019

Red Truck Ornament Saga

It should have been simple. All I needed to do was purchase a few 1 inch or 1 1/4 inch long red trucks; glue some Christmas trees in the back and put them in the ornaments. 

Red Truck Christmas Tree Ornament
This all started before Christmas last year, 2017, I usually give ornaments as gifts to a few of the people I work with. One co-worker hinted that she would like a red truck in her ornament.

She and I both remember the annual picnic trip to the forest to cut a Christmas tree, and if you're like us you feel a special nostalgia for the red truck bringing the December icon. Now-a-days I use artificial trees, but still enjoy setting up and decorating three trees with my wife. I hope that your family has a wonderful tradition of putting up and decorating a Christmas tree.

I explain how I make these ornaments back in August of 2016. Here is a link.

So I decided to make a few red truck ornaments last year, but could not find trucks the correct size.  Matchbox and Hot Wheels are too big! I searched the Christmas sections of every store; no suitable trucks were discovered. 
So last year I was unable deliver the red truck ornaments. 

This year I cut six trucks out of wood with $40 yard sale find scroll saw and a file. The wheels are sliced dowel rod. I used them with some success.

I figured I could find the correct truck on websites to print on my 3D printer, but I did not find the trucks I needed there either.

The 3D printer only cost $200 on Monoprice and the filament is affordable. 3D printing does require a little bit of technical learning, but I think it is worth it. 

I used Tinkercad.com to "draw" the red truck I thought would work. 

Red Truck designed on Tinkercad, 1954


3D print 60's truck


It turned out pretty good, and works great. Someone suggested what I already felt, there is an older model truck that is used also.

Here is a link to Thingiverse.com to gain the files, for free, to print for yourself.

Red Truck 1939 designed on Tinkercad

So I drew that truck also. 


3D print 1939 truck


I'm happy with the results.

Here is a link to Thingiverse.com to gain the files, for free, to print for yourself.

Link to download files to print.


Christmas Tree created with 3D pen

I used the 3D pen, a last year Christmas gift from my daughter, to create the trees.  Thank you, Andie.


Red Trucks with Christmas Trees 3D print


Once painted the trucks are ready for next year's ornaments. 


All content and information I present on this blog is intended for entertainment only and is presented “as is”, without claims or warranties of any kind, express or implied. I am not an expert of any kind; I just figure out how to make and create projects and I am willing to share that information. USE THIS INFORMATION AT YOUR OWN RISK! USE OF THIS INFORMATION CONSTITUTES AN AGREEMENT BY THE READER TO ASSUME ALL RISKS! The reader’s interpretation and application of this information shall be the reader’s sole responsibility. The reader agrees to hold harmless the author and publisher and therefore in no event shall the author or publisher be liable to the reader or any third party for any damages, claims, expenses or other costs; including, without limitation, legal fees arising from or in connection with the use of this information. The reader further agrees that their sole and exclusive remedy is to discontinue use of this information. I hold the copy right to the content if this blog and it may be used only with my permission. Your personal or contact information will not be shared with anyone, by me. I am not responsible for what the publisher or any of its partners do with your information. I reserve the right to change, close, sell or change the terms of use for this blog at any time. I am not responsible for any of the behavior or products presented by advertisers or sponsors in connection with this blog. If you wish to ask a question you may email me, however, I check my email about four times a year so a comment may work better. Please understand that any comments or emails sent become my property to use as desired.

Sunday, November 18, 2018

2018 Halloween Graveyard

2018 Halloween Graveyard

• Th ank God for the opportunity to know Him through His Word. • Praise God for His work in the world through broken vessels. • Ask God for wisdom and boldness in proclaiming the gospel message and our hope in Christ.

What happens when a pumpkin seed is dropped in a cemetery.
Tombstones and Jack-o-Lanterns
The sign say's, "Tricker or Treaters are Yummy, Delisous, Welcome."
Halloween yard decorations

Halloween Graveyard


DIY Candy Corn
We made the giant candy corn decorations that were featured last year on Home & Family on the Hallmark channel.

Halloween Candy Corn
Here's a link to the How-To. 

http://www.hallmarkchannel.com/home-and-family/how-to/diy-candy-corn-field

Tuesday, October 10, 2017

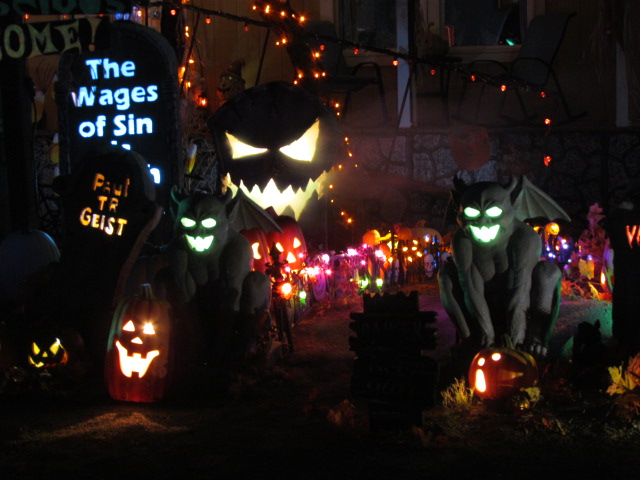
2017 Halloween Graveyard

Yard Decorations

This year I added a little conflict over candy corn.

candy corn fightI also added four new tombstones:
HE Isrisen
Vic Toms
Paul TR Giest
Herbie Sweets.

How I make the light up tombstones was posted July 1st, 2016.

DIY Halloween tombstone


Halloween graveyard

Halloween DIY tombstones

Trick or Treat sign


Halloween grave yard

Saturday, June 10, 2017

2017 VBS Galactic Starveyors worship rally

2017 VBS Galactic Starveyors worship rally ALL DONE!

2017 VBS Worship Rally

With all the instruments on the stage it's difficult to see the club house and its telescope, but the trees turned out good.

Wednesday, May 24, 2017

Disney inspired nursery name

Disney Nursery Name

A friend of my daughter-in-law made this sign for my grandson's nursery.


Tuesday, May 23, 2017


Cardboard Stage Tree 

Cardboard stage scenery tree

The 2017 VBS from LifeWay is Galactic Starveyors.  Looks like a few stage trees are needed. They are easily made from two inch Styrofoam, but if the budget is lacking;these may work instead. My guess is future VBS may need trees also, so if I can find a place to store them I will.


Here is a look at the tools and materials I used. The materials consist of cardboard and hot glue. I'll paint them latter. Cardboard is pretty abundant. When I go into Sam's Club* around 6:00 pm. they are more than happy to let me take large sheets of the stuff, and if I call Lowe's* in the morning and speak to the person in charge of the backroom they are nice enough to save me washer/dryer or refrigerator boxes. 

I'm working on two trees here, so there are photos of different trees at different steps of the construction.

I drew the tree trunk with a couple of bushes at the base. The bushes are needed to make the base as large as possible. The larger the base the more stable the tree will be. Also, I made sure on the second tree that one of the branches went straight up from the trunk. This will help the brace, that will be glued to the back later, to run straight up the entire tree. The first tree doesn't have this so the braces had to zigzag and are not as effective.


I have switched to cutting these big pieced with a jig saw. Wow, it was so much easier! than past cuts when I used a box knife. If you need identical pieces you can cut three or four sheets at a time.

When I use a box knife I cut one side then flip it over and cut along the other side where I can see where the blade cut most of the way through.


When I needed to make a sharp turn I just stopped the saw lifted it up and then plunged it back down through the cardboard in the direction I needed and started cutting again.


The only drawback is the frayed looking edges; which I trimmed with the sheet metal cutter and/or scissors. I'll get a blade with more teeth for future cuts and that should help.


Next I drew the foliage and cut them out. the foliage is a series of half circles around a large perimeter.  I made three little foliage pieces also.
(The orange is because I used that cardboard to paint giant carrots on in April 2017)


I needed a back brace so, I cut some four inch strips and scored them down the middle and folded them into an L shape. I held them against the back of the trunk and hot glued both sides.

I discovered that the best order of operations is glue the foliage to the trunk, then glue the back brace.

I Also needed a few more bushes to make the base for the tree,  Each tree needed two eight inch high strips; the longer the better.

I scored and bent the strips into rectangles, then cut cardboard-wide slots half way down from the top. I cut matching slots half way up from the bottom on the base of the tree. I slid the two together and this created a stand for the tree. 


I made most of the rectangle stick out the back of the tree, but I still needed enough out the front to keep the tree from falling forward.
Then I hot glued a small flat bottom bush to the front.


Now it was time to finish the top of the tree. 

I drew three small bits of foliage, and some one inch wide strips.  The length of the strips just needs to be enough to form into polygons.  


I put hot glue on the end of the polygons and stuck them to the foliage.


Finally, I put hot glue all along the edge of the two strips and pressed it to the foliage.


Ready for paint.


All content and information I present on this blog is intended for entertainment only and is presented “as is”, without claims or warranties of any kind, express or implied. I am not an expert of any kind; I just figure out how to make and create projects and I am willing to share that information. USE THIS INFORMATION AT YOUR OWN RISK! USE OF THIS INFORMATION CONSTITUTES AN AGREEMENT BY THE READER TO ASSUME ALL RISKS! The reader’s interpretation and application of this information shall be the reader’s sole responsibility. The reader agrees to hold harmless the author and publisher and therefore in no event shall the author or publisher be liable to the reader or any third party for any damages, claims, expenses or other costs; including, without limitation, legal fees arising from or in connection with the use of this information. The reader further agrees that their sole and exclusive remedy is to discontinue use of this information. I hold the copy right to the content if this blog and it may be used only with my permission. Your personal or contact information will not be shared with anyone, by me. I am not responsible for what the publisher or any of its partners do with your information. I reserve the right to change, close, sell or change the terms of use for this blog at any time. I am not responsible for any of the behavior or products presented by advertisers or sponsors in connection with this blog. If you wish to ask a question you may email me, however, I check my email about four times a year so a comment may work better. Please understand that any comments or emails sent become my property to use as desired.