Showing posts with label diy. Show all posts

Saturday, January 5, 2019

Red Truck Ornament Saga

It should have been simple. All I needed to do was purchase a few 1 inch or 1 1/4 inch long red trucks; glue some Christmas trees in the back and put them in the ornaments. 
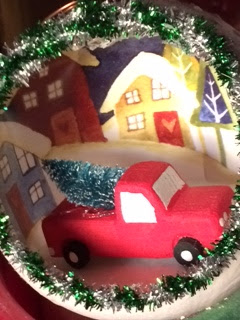
Red Truck Christmas Tree Ornament
This all started before Christmas last year, 2017, I usually give ornaments as gifts to a few of the people I work with. One co-worker hinted that she would like a red truck in her ornament.

She and I both remember the annual picnic trip to the forest to cut a Christmas tree, and if you're like us you feel a special nostalgia for the red truck bringing the December icon. Now-a-days I use artificial trees, but still enjoy setting up and decorating three trees with my wife. I hope that your family has a wonderful tradition of putting up and decorating a Christmas tree.

I explain how I make these ornaments back in August of 2016. Here is a link.

So I decided to make a few red truck ornaments last year, but could not find trucks the correct size.  Matchbox and Hot Wheels are too big! I searched the Christmas sections of every store; no suitable trucks were discovered. 
So last year I was unable deliver the red truck ornaments. 

This year I cut six trucks out of wood with $40 yard sale find scroll saw and a file. The wheels are sliced dowel rod. I used them with some success.

I figured I could find the correct truck on websites to print on my 3D printer, but I did not find the trucks I needed there either.

The 3D printer only cost $200 on Monoprice and the filament is affordable. 3D printing does require a little bit of technical learning, but I think it is worth it. 

I used Tinkercad.com to "draw" the red truck I thought would work. 
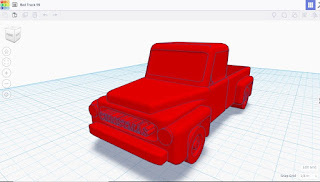
Red Truck designed on Tinkercad, 1954


3D print 60's truck


It turned out pretty good, and works great. Someone suggested what I already felt, there is an older model truck that is used also.

Here is a link to Thingiverse.com to gain the files, for free, to print for yourself.
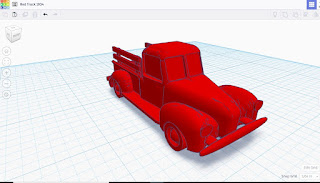
Red Truck 1939 designed on Tinkercad

So I drew that truck also. 


3D print 1939 truck


I'm happy with the results.

Here is a link to Thingiverse.com to gain the files, for free, to print for yourself.

Link to download files to print.


Christmas Tree created with 3D pen

I used the 3D pen, a last year Christmas gift from my daughter, to create the trees.  Thank you, Andie.


Red Trucks with Christmas Trees 3D print


Once painted the trucks are ready for next year's ornaments. 


All content and information I present on this blog is intended for entertainment only and is presented “as is”, without claims or warranties of any kind, express or implied. I am not an expert of any kind; I just figure out how to make and create projects and I am willing to share that information. USE THIS INFORMATION AT YOUR OWN RISK! USE OF THIS INFORMATION CONSTITUTES AN AGREEMENT BY THE READER TO ASSUME ALL RISKS! The reader’s interpretation and application of this information shall be the reader’s sole responsibility. The reader agrees to hold harmless the author and publisher and therefore in no event shall the author or publisher be liable to the reader or any third party for any damages, claims, expenses or other costs; including, without limitation, legal fees arising from or in connection with the use of this information. The reader further agrees that their sole and exclusive remedy is to discontinue use of this information. I hold the copy right to the content if this blog and it may be used only with my permission. Your personal or contact information will not be shared with anyone, by me. I am not responsible for what the publisher or any of its partners do with your information. I reserve the right to change, close, sell or change the terms of use for this blog at any time. I am not responsible for any of the behavior or products presented by advertisers or sponsors in connection with this blog. If you wish to ask a question you may email me, however, I check my email about four times a year so a comment may work better. Please understand that any comments or emails sent become my property to use as desired.

Saturday, June 10, 2017

2017 VBS Galactic Starveyors worship rally

2017 VBS Galactic Starveyors worship rally ALL DONE!

2017 VBS Worship Rally

With all the instruments on the stage it's difficult to see the club house and its telescope, but the trees turned out good.

Friday, April 7, 2017

Easter yard decorations - Carrots. 


Easter yard decorations giant carrots

I wanted some giant carrots to put in the yard with my other Easter decorations, and this year I figured out how to make them.  I know they look like upside down 2 liters, but until I discovered a suitable replacement.  Here is a link to the rest of the decorations before I installed the carrots.


Here is a view of the tools and materials I used. 


I measured the diameter of the 2 liter bottle. Since it was 4 1/4 inches, I sent the compass to 2 1/8 inches and drew a circle on a quarter inch thick piece of plywood.


I drilled two 1" holes, one for the light and one for the post that will hold the carrot in place.


Now I cut out the circle.


I trimmed off the bottom of the 2 liter bottle.


I drilled a hole through the bottom that was large enough for the sprig I purchased for the top of the carrot.


I pushed the wood disc into the bottom of the bottle and secured it with a few staples.


Time to make it orange.


I pushed the sprig into the hole, and
used a Sharpie to draw some carrot texture.


Then I drove a small pole (3/8" rebar) into the ground, installed a night light and dinner is served.


All content and information I present on this blog is intended for entertainment only and is presented “as is”, without claims or warranties of any kind, express or implied. I am not an expert of any kind; I just figure out how to make and create projects and I am willing to share that information. USE THIS INFORMATION AT YOUR OWN RISK! USE OF THIS INFORMATION CONSTITUTES AN AGREEMENT BY THE READER TO ASSUME ALL RISKS! The reader’s interpretation and application of this information shall be the reader’s sole responsibility. The reader agrees to hold harmless the author and publisher and therefore in no event shall the author or publisher be liable to the reader or any third party for any damages, claims, expenses or other costs; including, without limitation, legal fees arising from or in connection with the use of this information. The reader further agrees that their sole and exclusive remedy is to discontinue use of this information. I hold the copy right to the content if this blog and it may be used only with my permission. Your personal or contact information will not be shared with anyone, by me. I am not responsible for what the publisher or any of its partners do with your information. I reserve the right to change, close, sell or change the terms of use for this blog at any time. I am not responsible for any of the behavior or products presented by advertisers or sponsors in connection with this blog. If you wish to ask a question you may email me, however, I check my email about four times a year so a comment may work better. Please understand that any comments or emails sent become my property to use as desired.

Sunday, August 21, 2016

Coyote Christmas Ornaments; great DIY gifts.

Christmas ornaments gourd
gourd Christmas ornaments


These Christmas ornaments make beautiful gifts. Each ornament is one of a kind. They are made out of gourds, coyote melons, Cucurbita palmata. 

The gourds from a plant with five pointed leaves works better than the the plant with long narrow leaves,


Curcurbita foetidissima, which grows a gourd that has a much thinner wall. 


If I want six ornaments I start with about nine, because a few of them do not make it. 


I think the paint adheres a little better if I give it a light sanding.


I drill a 3/16 to ¼ inch hole in one end of the gourd. The end that has a larger spot is easier to drill through.


I need a line to follow as I cut out the window hole. The lid of a spray paint works best for tracing a line.


I use a Dremel with a cutting bit to cut along the line. I firmly pinch the Dremel between the base of the thumb and first finger so that I the tips of the thumb and finger are braced against the gourd as I twist it with the other hand.


After cutting, I pry off the lid and clean out the seeds with a little tool I created, but something like a spoon will work. 


Once it is cleaned out, time to paint the outside.


Once the paint is dry I glue a “floor” inside the gourd. Cardboard, like the kind cereal boxes are made of, works. I cut it into a square then trim off the corners until it is a circle. I test fit the floor several times and trim it until I get the fit I'm looking for. I want it to be just large enough to fill the gourd just below the inside of the hole. 


Next I drip white glue all along the the edge of the cardboard.


Then I use a strip of cardboard to push and spread the glue up against the wall of the gourd.


Once the floor is dry I cut a quarter of a pipe cleaner (chenille stick) and bend it into a loop and twist it at the bottom. 


The ends are pushed through the hole in the top, 

and then are spread and hot glued. I use white paint on the floor and couple of inches inside the window hole.

I have a collection of old Christmas cards I cut out to act as the background. 
 
 Background cards


It usually takes several trimming and fitting sessions to get it right. 


I glue the right and left edges and the top to the inside of the gourd.


A piece of felt or some sort of cover is cut and glued to the floor. I use a good amount of glue.


Then I glue in the characters; this one gets a cat and two gifts. I use white glue to hold the character in the ornament, 


and I use hot glue to hold the character in as the white glue dries.


Character Cards

Some of the Christmas cards can be used as background and characters. 


I carefully cut out around each character 

leaving a base that I will be able to bend and


glue to the floor.


Once they are dry I cover the floor with glue and: 


saw dust, tiny Styrofoam beads, or glitter.


The next to last step is to trim the edge of the window hole. My wife actually created this part. She uses pipe cleaners, beads, ribbons or string. Usually two of these are twisted together hot glued around the edge. She hardly ever start at the dead top center. 


Now a small “flat-backed” element is glued where the two ends meet. To make sure it stays a little bit of white glue is put along the trim and the outer part of the gourd to keep it in place. 


I'll usually paint elements or apply glitter to the outside, spray it with shinny clear coat. Last I sign it and glue a small label against the top inside. The label has the year and ornament number on it.

Merry Christmas!

All content and information I present on this blog is intended for entertainment only and is presented “as is”, without claims or warranties of any kind, express or implied. I am not an expert of any kind; I just figure out how to make and create projects and I am willing to share that information. USE THIS INFORMATION AT YOUR OWN RISK! USE OF THIS INFORMATION CONSTITUTES AN AGREEMENT BY THE READER TO ASSUME ALL RISKS! The reader’s interpretation and application of this information shall be the reader’s sole responsibility. The reader agrees to hold harmless the author and publisher and therefore in no event shall the author or publisher be liable to the reader or any third party for any damages, claims, expenses or other costs; including, without limitation, legal fees arising from or in connection with the use of this information. The reader further agrees that their sole and exclusive remedy is to discontinue use of this information. I hold the copy right to the content if this blog and it may be used only with my permission. Your personal or contact information will not be shared with anyone, by me. I am not responsible for what the publisher or any of its partners do with your information. I reserve the right to change, close, sell or change the terms of use for this blog at any time. I am not responsible for any of the behavior or products presented by advertisers or sponsors in connection with this blog. If you wish to ask a question you may email me, however, I check my email about four times a year so a comment may work better. Please understand that any comments or emails sent become my property to use as desired.