Showing posts with label decorations. Show all posts

Friday, March 17, 2017

 St. Patrick's Day decorations

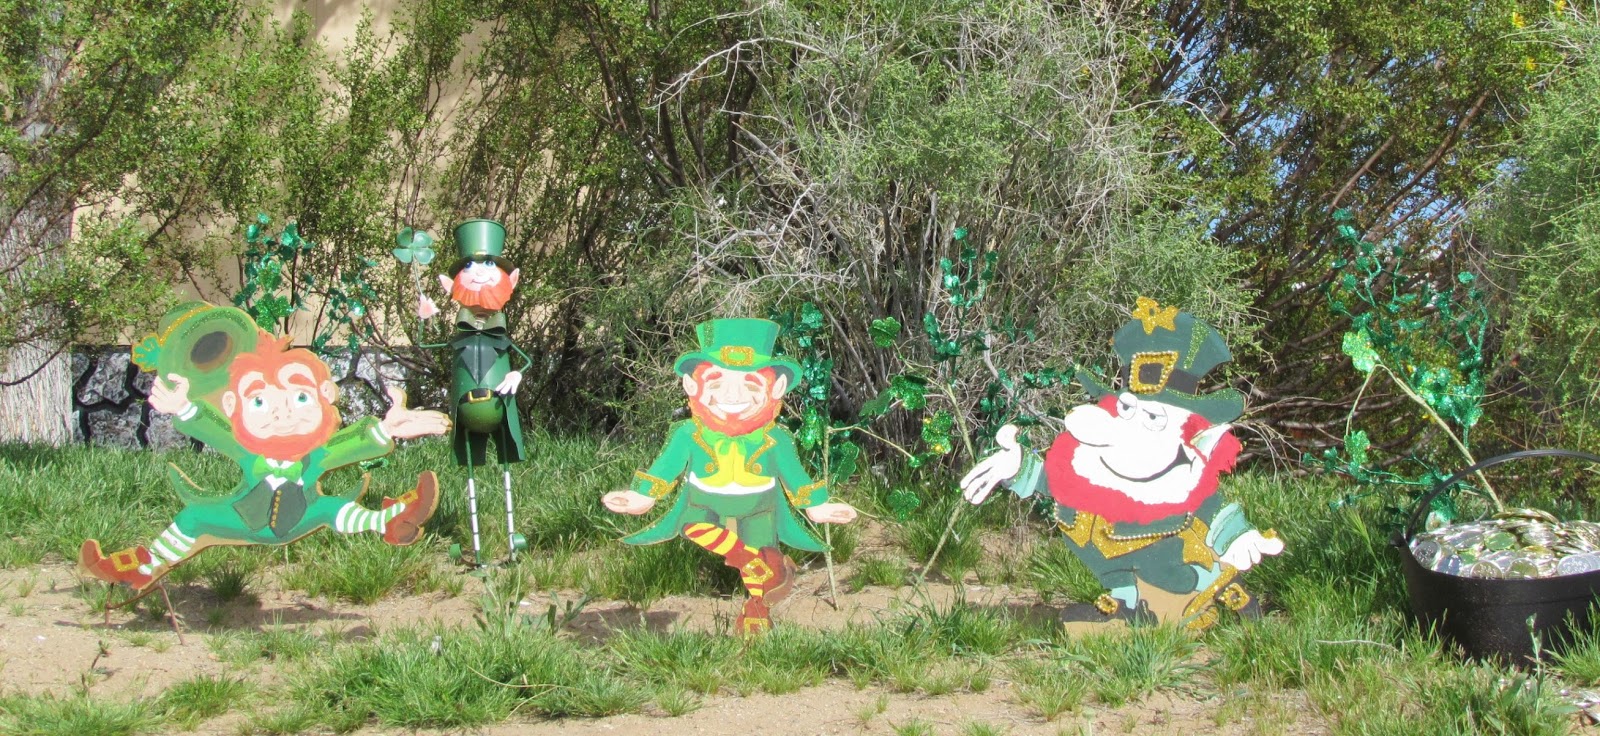
 Here is a shot of the little guys I put out each year.  My goal is to someday have 20 of these leprechauns with a sign that reads, "Find all 21 Leprechauns!"
St Patrick's Day decorations

Thursday, October 20, 2016

2016 Golden Valley Graveyard front yard decorations

Here are a few photos to show how the 2016 graveyard turned out.  Pretty happy with the show.  You can see a video on Youtube 2016 Halloween graveyard


Halloween yard haunt


lighted tombstones

Halloween yard decorations

 The tombstone with the face is inspired by David Lowe Design blog.

diy tombstones

Halloween decorations


Halloween decorations

diy lighted tomebstones


Saturday, June 18, 2016

2016 VBS Submerged worship rally stage

2016 Submerged VBS controls
Gauges and levers added to bridge


Here is how the gauges and levers looked on the
cardboard control panel (bridge).


32 gears were made and wired to cardboard
walls.  About a third of the gears are 2D.

2016 Submerged VBS gear wall
Left Gear wall 25" x 8'
Right Gear wall 25" x 8'

Sunday, June 5, 2016

Photographing Yard Decorations a Bit of Advice

 I have found that taking photos of holiday decorations can be tricky. Some elements are visible during the day, but the lights look best in dark. So, to take a good photo of my decorations I need a time when it is both day and night. (Spoiler Alert, if you have never seen the movie Ladyhawk skip to the next paragraph.) If you're a Ladyhawk fan you know that there is a time when it is both day and night; during an eclipse. Unfortunately, I am not willing to track the timing of eclipses, and doubt one would happen while I'm standing in my yard with a camera.

Fortunately there is another time when the light is right for taking photos of yard decorations. It is the hour after the golden hour. The golden hour is highly prized in photography and movie making. It is the hour just before sundown or if you're an early bird just after sunrise. There is a golden hour calculator on line, but during the golden hour is too bright to effectively see or photo graph exterior illumination.  So, I wait.

I discovered there is also a medical golden hour: when someone has a traumatic injury the hour immediately following the injury is the best time to get life saving treatment, so do not hesitate to call 911.

Video Warning: here's an interesting note, video needs more light than photographs. If you want to video your decorations, you'll need to start your production twenty to fifteen minutes earlier than if you are taking photos.  

You can use this progression of photos of this year's Independence Day decorations taken with an Iphone 4s, no flash. You can use them as a guide for the best time to take your photos.

Taken during the afternoon, home faces west.

...during the golden hour; trees cast shadows,

at dusk,

about 30 to 40 minutes after dusk,

more than 50 minutes after sunset there are a few stars in the sky,

 it's dark.


The lights were purchased at Christmas time and zip-tied together to imitate bunting.  

Yes, I realize that cameras have exposure settings that can be adjusted and photo editing can help brighten photos, but I like to keep things speedy. 


All content and information I present on this blog is intended for entertainment only and is presented “as is”, without claims or warranties of any kind, express or implied. I am not an expert of any kind; I just figure out how to make and create projects and I am willing to share that information. USE THIS INFORMATION AT YOUR OWN RISK! USE OF THIS INFORMATION CONSTITUTES AN AGREEMENT BY THE READER TO ASSUME ALL RISKS! The reader’s interpretation and application of this information shall be the reader’s sole responsibility. The reader agrees to hold harmless the author and publisher and therefore in no event shall the author or publisher be liable to the reader or any third party for any damages, claims, expenses or other costs; including, without limitation, legal fees arising from or in connection with the use of this information. The reader further agrees that their sole and exclusive remedy is to discontinue use of this information. I hold the copy right to the content if this blog and it may be used only with my permission. Your personal or contact information will not be shared with anyone, by me. I am not responsible for what the publisher or any of its partners do with your information. I reserve the right to change, close, sell or change the terms of use for this blog at any time. I am not responsible for any of the behavior or products presented by advertisers or sponsors in connection with this blog. If you wish to ask a question you may email me, however, I check my email about four times a year so a comment may work better. Please understand that any comments or emails sent become my property to use as desired.
Sunday, May 8, 2016


Construct controls and gauges for your sub's helm.

2016 Submerged VBS gauges

2016 Submerged VBS gauges


The technique used to make the gears is great for making gauges and controls the the Submerged helm.

I cut two pieces of cardboard at the same time to ensure that the front and back are congruent, the same shape and same size. Then cut out the opening on the front piece and glue a narrow strip around the inside; glue a piece that is a little larger than the opening to the narrow strip. This creates the inner part of the gauge.

Now, take a wider strip and glue it around the outside and glue the back on. Cut our a trim piece to go around the opening or outer edge or both. Be creative about the arrows and calibrations you put on the inside as you desire. After a light coat of primer I painted them to match the consoles they'll be glued to later. I left the inside primer white to make them more visible.

String was hot glued to the inside of the microphone to create the mesh on the front.


The levers are layers of cardboard hot glued onto each other.

All content and information I present on this blog is intended for entertainment only and is presented “as is”, without claims or warranties of any kind, express or implied. I am not an expert of any kind; I just figure out how to make and create projects and I am willing to share that information. USE THIS INFORMATION AT YOUR OWN RISK! USE OF THIS INFORMATION CONSTITUTES AN AGREEMENT BY THE READER TO ASSUME ALL RISKS! The reader’s interpretation and application of this information shall be the reader’s sole responsibility. The reader agrees to hold harmless the author and publisher and therefore in no event shall the author or publisher be liable to the reader or any third party for any damages, claims, expenses or other costs; including, without limitation, legal fees arising from or in connection with the use of this information. The reader further agrees that their sole and exclusive remedy is to discontinue use of this information. I hold the copy right to the content if this blog and it may be used only with my permission. Your personal or contact information will not be shared with anyone, by me. I am not responsible for what the publisher or any of its partners do with your information. I reserve the right to change, close, sell or change the terms of use for this blog at any time. I am not responsible for any of the behavior or products presented by advertisers or sponsors in connection with this blog. If you wish to ask a question you may email me, however, I check my email about four times a year so a comment may work better. Please understand that any comments or emails sent become my property to use as desired.

Friday, April 22, 2016

Making cheap 3-dimensional gears for decorations

2016 Submerged VBS how to make cardboard gears

This year's VBS decorations calls for a bunch of large gears! The 2016 Life Way Vacation Bible School is "Submerged" Worship Rally decoration theme is the interior of the helm of a sub. LifeWay Vacation-Bible-School/Submerged   Here's a way to make the gears without spending a couple hundred dollars on Styrofoam. Cardboard is cheap, people are practically giving it away. In the evening the big club store, Sam's Club, I drive by tidies up their shelves; when I asked if I could take all the large flat pieces, they said, “Sure, take all you want.”  

So get you hands on some big pieces of cardboard, string and pencil or large compass, a hot glue gun, lots of glue sticks, big scissors or tin snips and sharp utility knife, a sturdy straight edge, cheap flat white primer spray paint and paint the colors of your choice.

Start by trimming of any edges so you have a flat piece of cardboard to work with.
 
Draw several circles on the cardboard. Use a string or compass or project the gears from clip art or free hand them. I wanted my gears to look a bit wonky so I didn't worry about getting them perfect. The space between outer circle and an inner circle will be the height of the gear's teeth. Draw two more inner circles to help guide you in making the interior cutouts.


Draw evenly space lines across the circles to help guide the placement of the teeth and cut outs. It worked best, for me, to imagine the circles are the face of a clock. Draw a line from 12 to 6, then from 3 to 9, twist the cardboard so the top of the first line is at 10:30 and repeat the 12 to 6 and the 3 to 9 lines. 
Now, draw lines to make the teeth, and the center cut outs.


Cut it all out, be careful.    


Plug the hot glue gun in about now.

Take another piece of cardboard and draw a several parallel lines. Make sure they are all the same width. It'll work out better in you draw the lines perpendicular to the corrugation in the cardboard, because the strips will be easier to bend around corners. Carefully cut those strips..


Glue the strips alone the edges; the inner cutouts first, then along the outer edge.


Glue any desired embellishments to the front.


2016 Submerged VBS how to make cardboard gears


Put on a light coat of white primer.


It's now ready for paint.

All content and information I present on this blog is intended for entertainment only and is presented “as is”, without claims or warranties of any kind, express or implied. I am not an expert of any kind; I just figure out how to make and create projects and I am willing to share that information. USE THIS INFORMATION AT YOUR OWN RISK! USE OF THIS INFORMATION CONSTITUTES AN AGREEMENT BY THE READER TO ASSUME ALL RISKS! The reader’s interpretation and application of this information shall be the reader’s sole responsibility. The reader agrees to hold harmless the author and publisher and therefore in no event shall the author or publisher be liable to the reader or any third party for any damages, claims, expenses or other costs; including, without limitation, legal fees arising from or in connection with the use of this information. The reader further agrees that their sole and exclusive remedy is to discontinue use of this information. I hold the copy right to the content if this blog and it may be used only with my permission. Your personal or contact information will not be shared with anyone, by me. I am not responsible for what the publisher or any of its partners do with your information. I reserve the right to change, close, sell or change the terms of use for this blog at any time. I am not responsible for any of the behavior or products presented by advertisers or sponsors in connection with this blog. If you wish to ask a question you may email me, however, I check my email about four times a year so a comment may work better. Please understand that any comments or emails sent become my property to use as desired.