Tuesday, October 10, 2017

2017 Halloween Graveyard

Yard Decorations

This year I added a little conflict over candy corn.

candy corn fightI also added four new tombstones:
HE Isrisen
Vic Toms
Paul TR Giest
Herbie Sweets.

How I make the light up tombstones was posted July 1st, 2016.

DIY Halloween tombstone


Halloween graveyard

Halloween DIY tombstones

Trick or Treat sign


Halloween grave yard

Saturday, June 10, 2017

2017 VBS Galactic Starveyors worship rally

2017 VBS Galactic Starveyors worship rally ALL DONE!

2017 VBS Worship Rally

With all the instruments on the stage it's difficult to see the club house and its telescope, but the trees turned out good.

Wednesday, May 24, 2017

Disney inspired nursery name

Disney Nursery Name

A friend of my daughter-in-law made this sign for my grandson's nursery.


Tuesday, May 23, 2017


Cardboard Stage Tree 

Cardboard stage scenery tree

The 2017 VBS from LifeWay is Galactic Starveyors.  Looks like a few stage trees are needed. They are easily made from two inch Styrofoam, but if the budget is lacking;these may work instead. My guess is future VBS may need trees also, so if I can find a place to store them I will.


Here is a look at the tools and materials I used. The materials consist of cardboard and hot glue. I'll paint them latter. Cardboard is pretty abundant. When I go into Sam's Club* around 6:00 pm. they are more than happy to let me take large sheets of the stuff, and if I call Lowe's* in the morning and speak to the person in charge of the backroom they are nice enough to save me washer/dryer or refrigerator boxes. 

I'm working on two trees here, so there are photos of different trees at different steps of the construction.

I drew the tree trunk with a couple of bushes at the base. The bushes are needed to make the base as large as possible. The larger the base the more stable the tree will be. Also, I made sure on the second tree that one of the branches went straight up from the trunk. This will help the brace, that will be glued to the back later, to run straight up the entire tree. The first tree doesn't have this so the braces had to zigzag and are not as effective.


I have switched to cutting these big pieced with a jig saw. Wow, it was so much easier! than past cuts when I used a box knife. If you need identical pieces you can cut three or four sheets at a time.

When I use a box knife I cut one side then flip it over and cut along the other side where I can see where the blade cut most of the way through.


When I needed to make a sharp turn I just stopped the saw lifted it up and then plunged it back down through the cardboard in the direction I needed and started cutting again.


The only drawback is the frayed looking edges; which I trimmed with the sheet metal cutter and/or scissors. I'll get a blade with more teeth for future cuts and that should help.


Next I drew the foliage and cut them out. the foliage is a series of half circles around a large perimeter.  I made three little foliage pieces also.
(The orange is because I used that cardboard to paint giant carrots on in April 2017)


I needed a back brace so, I cut some four inch strips and scored them down the middle and folded them into an L shape. I held them against the back of the trunk and hot glued both sides.

I discovered that the best order of operations is glue the foliage to the trunk, then glue the back brace.

I Also needed a few more bushes to make the base for the tree,  Each tree needed two eight inch high strips; the longer the better.

I scored and bent the strips into rectangles, then cut cardboard-wide slots half way down from the top. I cut matching slots half way up from the bottom on the base of the tree. I slid the two together and this created a stand for the tree. 


I made most of the rectangle stick out the back of the tree, but I still needed enough out the front to keep the tree from falling forward.
Then I hot glued a small flat bottom bush to the front.


Now it was time to finish the top of the tree. 

I drew three small bits of foliage, and some one inch wide strips.  The length of the strips just needs to be enough to form into polygons.  


I put hot glue on the end of the polygons and stuck them to the foliage.


Finally, I put hot glue all along the edge of the two strips and pressed it to the foliage.


Ready for paint.


All content and information I present on this blog is intended for entertainment only and is presented “as is”, without claims or warranties of any kind, express or implied. I am not an expert of any kind; I just figure out how to make and create projects and I am willing to share that information. USE THIS INFORMATION AT YOUR OWN RISK! USE OF THIS INFORMATION CONSTITUTES AN AGREEMENT BY THE READER TO ASSUME ALL RISKS! The reader’s interpretation and application of this information shall be the reader’s sole responsibility. The reader agrees to hold harmless the author and publisher and therefore in no event shall the author or publisher be liable to the reader or any third party for any damages, claims, expenses or other costs; including, without limitation, legal fees arising from or in connection with the use of this information. The reader further agrees that their sole and exclusive remedy is to discontinue use of this information. I hold the copy right to the content if this blog and it may be used only with my permission. Your personal or contact information will not be shared with anyone, by me. I am not responsible for what the publisher or any of its partners do with your information. I reserve the right to change, close, sell or change the terms of use for this blog at any time. I am not responsible for any of the behavior or products presented by advertisers or sponsors in connection with this blog. If you wish to ask a question you may email me, however, I check my email about four times a year so a comment may work better. Please understand that any comments or emails sent become my property to use as desired.

Friday, April 21, 2017

Cardboard Telescope (part 5) the Lenses

Prop cardboard telescope

After this step the whole project will be ready for paint.


I like the thin transparent plastic from containers that spinach and danishes come in for the lenses.

I traced around the large end of the telescope ,made in part 4, then added four tabs and cut it out. 


I wondered if I painted stars and a planet on the inside of the lens if the children would be able to see them, so I tried it.


The eye piece began with a 9' x 4" rectangle of cardboard. I drew it, cut it, and scored it.


I hot glued a narrow slice of cardboard on the inside and then glued it into a tub.


I cut two discs the same diameter as the small end of the telescope that was created in part 4.  Then I cut holes in those discs so the tub I just made fit inside.


I glued both of those discs onto the end of the eye piece. 


Next, I put hot glue around the edges of both discs and fitted it into the telescope.


The paint had dried on the large lens so I folded the tabs put hot glue on them and fitted the lens to the end of the telescope.  


Then I hot glued a two inch wide strip around the end with a little bit of overhang.  This hid the tabs and gave it a finished look.


A look through the eye piece.   


Not bad.


I attached a lens over the eye piece the same way I did with the wide end.


Here is the finished eye piece lens.


I'll probably add a few rivets and knobs before painting, but here it is. 


Prop telescope made from cardboard


All content and information I present on this blog is intended for entertainment only and is presented “as is”, without claims or warranties of any kind, express or implied. I am not an expert of any kind; I just figure out how to make and create projects and I am willing to share that information. USE THIS INFORMATION AT YOUR OWN RISK! USE OF THIS INFORMATION CONSTITUTES AN AGREEMENT BY THE READER TO ASSUME ALL RISKS! The reader’s interpretation and application of this information shall be the reader’s sole responsibility. The reader agrees to hold harmless the author and publisher and therefore in no event shall the author or publisher be liable to the reader or any third party for any damages, claims, expenses or other costs; including, without limitation, legal fees arising from or in connection with the use of this information. The reader further agrees that their sole and exclusive remedy is to discontinue use of this information. I hold the copy right to the content if this blog and it may be used only with my permission. Your personal or contact information will not be shared with anyone, by me. I am not responsible for what the publisher or any of its partners do with your information. I reserve the right to change, close, sell or change the terms of use for this blog at any time. I am not responsible for any of the behavior or products presented by advertisers or sponsors in connection with this blog. If you wish to ask a question you may email me, however, I check my email about four times a year so a comment may work better. Please understand that any comments or emails sent become my property to use as desired.

Saturday, April 15, 2017

Cardboard Telescope (part 4) 

for 2017 VBS Galactic Starveyors


Here is a look at the materials and tools I'll use.


I measured three panels and two strips: the panels' dimenstions were 26 by 12 inch, 24 by 10 and 22 by 11 inches.  The strips are each 2 by 24


I made sure that the ridges of the cardboard ran across the short length of the panels; that will make them easier for me to curl into a tub.


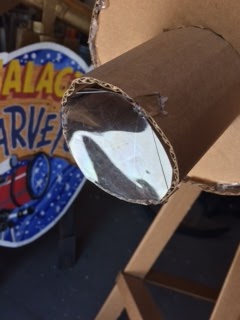
I cut them and scored them. I used a small board to score them; the width of the board made pressing down more comfortable. 


I wanted it to be a fairly round tube so I scored it a bunch of times.


I curled it all up so it would stay in the shape I wanted. 


I needed a 1 inch strip to glue the two ends together; put a line of hot glue on one side and pressed it to the inside of the tube. then ran a line of hot glue along the exposed edge and press the tub together.


I repeated that process to create the three tubs that will be the body of the telescope.


I cut a few random strips to act as spacers between the different sections.  I hot glued the two strips around the end of the smaller tub then put hot glue around the strip and pressed it into the larger tub.


The body of the telescope it assembled.  


Next I needed a mount to attach the telescope to the tripod.


I started with a 9 by 4 inch rectangle. The 9 inches will be curled into a tub and will fit in the hole in the top of the tripod head.

Now I needed supports to attach to the bottom of the telescope. The center of each support needed to be exactly half the length of the rectangle apart from each other so they would be directly apart from each other when the tub is curled, so for 9 inches they needed to be 4 1/2 inches part.


I measured 2 inches from the end then 4 1/2 inches from that.  Then I measured 1 inch from on each side of those marks. That made two risers that are 2 by 3 inches 


Now I measured up 7/8 of an inch on both insides of the tabs and drew a slanted line out to the top of the tab.  This will be the angle the telescope will face toward the stars.  I drew a two inch wide and four inch long angled support.


I cut two cardboard wide slots in the center of the two risers.


I cut the hole thing out, and I cut the two slanted supports from each other.


I scored the 9 by 4 inch section and between the risers and the supports.


When I curled the rectangle into a tub the risers tore so I cut a four braces and hot glued them to the inside of the risers.


I cut a 3 by 3 1/2 inch brace to hot glue inside the two slots I cut out of the risers.  I curved the top of this piece in case it came in contact with the telescope; it didn't.


I drew a 3 inch circle inside a 4 1/2 inch circle. Then I cut them both out and hot glued it to around the tub.


I balanced the body of the telescope on my finger to find its center of gravity, and marked it so I knew were to glue the mount.


So far so good.


 In the next and final step I'll put the eye piece, lenses and trim on.


All content and information I present on this blog is intended for entertainment only and is presented “as is”, without claims or warranties of any kind, express or implied. I am not an expert of any kind; I just figure out how to make and create projects and I am willing to share that information. USE THIS INFORMATION AT YOUR OWN RISK! USE OF THIS INFORMATION CONSTITUTES AN AGREEMENT BY THE READER TO ASSUME ALL RISKS! The reader’s interpretation and application of this information shall be the reader’s sole responsibility. The reader agrees to hold harmless the author and publisher and therefore in no event shall the author or publisher be liable to the reader or any third party for any damages, claims, expenses or other costs; including, without limitation, legal fees arising from or in connection with the use of this information. The reader further agrees that their sole and exclusive remedy is to discontinue use of this information. I hold the copy right to the content if this blog and it may be used only with my permission. Your personal or contact information will not be shared with anyone, by me. I am not responsible for what the publisher or any of its partners do with your information. I reserve the right to change, close, sell or change the terms of use for this blog at any time. I am not responsible for any of the behavior or products presented by advertisers or sponsors in connection with this blog. If you wish to ask a question you may email me, however, I check my email about four times a year so a comment may work better. Please understand that any comments or emails sent become my property to use as desired.