DIY lit Halloween Decoration Tombstone
There is a materials and tools list at the end of the article
Introduction
I have
been making these tombstones for about 8 years and finally feel I've
figured out some pretty good methods to complete them. Still, I'm
always open to improving, so if you think of a better way; please let
me know by making a comment. To see the 2013 vid. of several other light up tombstones follow this link: VIDEO
Make the front, back and sides
These tombstones are hollow with a Styrofoam front and a plywood back. Styrofoam strips are used as sides and the top to create a space between the front and back. I start with a piece of Styrofoam, plywood and cardboard that are all about the same size and as big as I need for my tombstone. The ones I've made for my yard are viewed from the road about forty feet away so I make a back row of big tombstones and a front row of smaller ones. The example for this article is a small one.
 |
The
small tombstone I'm making will use 3/8 inch re-bar and ½ inch PVC
pipe. If I were making a large tombstones I would use ½ inch re-bar
and ¾ inch PVC pipe.
|

To
create a pattern I fold cardboard in half and draw the desired shape,
then I cut that pattern out and trace it onto the Styrofoam. Folding
the cardboard in half to make the pattern gives me the symmetrical
look I desire, but I have to admit in the future I'll be trying some
more funky looking tombstones I've seen online.
I cut
the Styrofoam using my low-cost self-made hot wire cutters; one
hand-held and one table cutter. There are many websites and videos
about how to make or purchase your own hot wire cutter. Plus there
are many different ways of cutting Styrofoam.
If you make your own
tombstone just use the method that is best for your situation.
I
always cut Styrofoam in a well ventilated place.
Now, I
traced the shape on the Styrofoam onto the plywood and cut it with the jigsaw.
This will give me a matching front and back.
(The photo shows the front with the words already cut out, I'll be doing that soon.)
I take caution here to mark the INSIDE of the plywood so that later I put the strips on correctly. This is especially important for asymmetrical tombstones.
I prime
the back, plywood, painting both sides and the edges.
I cut
several strips of Styrofoam, later I'll glue them to the sides and
top edges of the plywood. They need to be uniform. I
always cut Styrofoam in a well ventilated place.
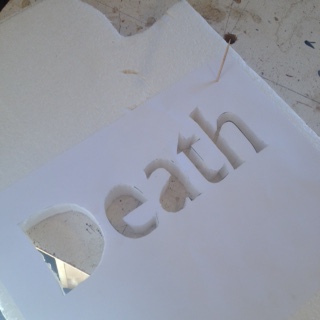
Cut
the Script on the front
I use a
computer create the script that is desired on the tombstone. Once it
is printed I use a razor knife to cut out the letters and graphics, I
cut out the spaces inside letters like “a” and “d” first. I'm
careful to save these pieces.
Now I
pin the stencil to the Styrofoam with toothpicks. The paper is a great guide because the hot wire will not cut through
the paper.
I use my
self-made hand-held Styrofoam cutter to punch a hole down through
each letter, this will allow me to thread the wire on table cutter
through each letter.
I cut
out the inside pieces of letters like “a” and “d” first and
save them.
Create
the sides
Now I
lay out the sides and top by dry fitting them
first.
The strips, along the sides are easy, but usually several angle
cuts are needed to create the top. The goal is to have most of the
Styrofoam on the plywood, and have a little hanging over the edge.
I
don't worry about getting it just right because it will be trimmed
off later.
What
color with the script be on the finished tombstone?
There
are two options when it comes to determining the color of the script;
1. Paint the inside of the back of the tombstone the color you want
the script to be. This option makes the color to fairly permanent,
but is usually very bright even during the day.
2. Leave the back white and use a
colored light bulb to color the script. This option allows the color
to be changed, but is only as bright as the light bulb I use.
Special note here: I use a LED light bulb; incandescent will melt the
Styrofoam.
For this tombstone I'm using option number one and
painting the inside back pumpkin orange.
It
is important to do the next two steps before the tombstone's front
and back are glued together.
Installation/mounting
system
Okay,
here's how I display these things in my yard. I pound two pieces of
re-bar into the ground and then slide the tombstone's PVC pipes onto
them, so I need to mount the pipe to the inside of the tombstone.
First,
I trace a line along the inside of the Styrofoam strip, even though
it is not glued yet, to act as a guide for where the PVC pipes will
be mounted. I must leave a space for the strip of Styrofoam that will
be glued to the sides and top.
I cut the pipes to the correct
length, I spray painted the them orange. It is likely they will be
seen through the script. I have brush painted them with acrylic paint
after lightly sanding them and that worked. I always spray paint in a
well ventilated place and with a good drop cloth, because spray paint
sprays everywhere.
(Whenever
I spay paint and do not use the whole can I hold it upside down and
spray for a second; this clears the nozzle so paint does not dry in
there and clog it.)
I
use four bolts, nuts and lock washers to mount the pipe. I need two
drill bits; one a little larger than the head of the bolt and one a
little larger than the shaft of the bolt.
The large bit is used
first to drill a hole through one side of the PVC.
(I wasn't paying attention and drilled a hole in the middle of each pipe. Just ignore them; they are unnecessary.)
I place the pipe
next to the line that was traced to leave room for the Styrofoam
side. Then put the small bit through the large hole and drill through
the inside of the pipe and out the plywood at the same time.
Drill
two in each pipe one near each end.
 Now
I put the bolt through the pipe so it sticks out the back, hold it with a screwdriver, and tighten
the lock washer and nut to it; for all four holes.
Now
I put the bolt through the pipe so it sticks out the back, hold it with a screwdriver, and tighten
the lock washer and nut to it; for all four holes.
The pipe will
hold tight to the back and allow the re-bar to slide up into it.

Time
to put those little pieces of Styrofoam back into the a, e and d
I
do this step in a place that I can leave the tombstone for twenty-four hours undistributed. I am very cautious to make sure
the front is face down. If the letters are backwards I know I have it
right.
Through the years I have done this many different ways: with
toothpicks, with fishing string, with cloth. Today I will be using
bailing wire.
 I think the reason it hasn't mattered what material I
use to span the gap between the body of the tombstone and the little
piece of letter, is because I use Mod Podge as the glue. (Whenever I
use the word glue in this article I mean Mod Podge.) There are many
different glues that will adhere Styrofoam, but I used Mod Podge on
the first one I made, because I knew it would dry waterproof and I
had some handy. It worked great.
I think the reason it hasn't mattered what material I
use to span the gap between the body of the tombstone and the little
piece of letter, is because I use Mod Podge as the glue. (Whenever I
use the word glue in this article I mean Mod Podge.) There are many
different glues that will adhere Styrofoam, but I used Mod Podge on
the first one I made, because I knew it would dry waterproof and I
had some handy. It worked great.
I
drive myself crazy using my finger to adjust the little pieces into
the proper position, so I use a Popsicle stick to adjust them.
I
curled the ends of the wire to keep them from rolling around and add
more surface area for the glue to hold on to.

The Popsicle stick is
now used to get as much Mod Podge on and around the wire ends as
possible without dripping.

In my youth I would rush to the next step,
now that I am older and wiser I wait twenty-four hours for the Mod
Podge to dry.
Glue
the front, sides and back together
This
is another step that needs to be done in a place where the tombstone
can be left for twenty-four hours undistributed.
I lay the front face
down on a smooth flat surface. Then pour/rub Mod Podge all along the edge.
I lay the strips and top
Styrofoam pieces on the Mod Podge. Wiggle them around a little to
ensure that the glue is covering as much surface as possible.
Now, I
put the glue on the strips and put the back of the tombstone on top
of that.
I make sure the PVC pipe is inside the tombstone, and put
some heavy objects on the back of the tombstone to help hold it
tight, without crushing, while the glue dries.
 Trim
the top
Trim
the top
Once
the glue dries, I take the tombstone back to the hot wire and trim
the edges so the front back, sides and top are all even, flush. I
always cut Styrofoam in a well ventilated place.
Sometimes
there are gaps between the pieces that make up the top, I spread a
little glue on wedge shaped slivers of Styrofoam and push it into
these gaps, then trim them off when the glue is dry.
Sometimes the hot wire leaves little ribs; I just sand those smooth.

Make a hole for the light
There are different ways to put a light inside, I drill a one inch hole in a spot so it is not visible through the letters.
 Add
the decorations
Add
the decorations
I
sketched the decorations I want on plain paper then cut them out;
these will be my patterns.
I make sure they will fit on the
tombstone, and get out my thin, ¼”, Styrofoam that I save from
different packages.
I need two of the serpents, so I pinned two
pieces of Styrofoam under one pattern and cut them out at the same
time.
Last I cut out the skull and then punched out its eyes. I always cut Styrofoam in a well ventilated place.
They're glue on, now.
Paint
There
are lots of ways to paint tombstones; here's how I do it. I pick a
color usually complementary with the inside color to use with black
and white.
I was going to use blue, but when I started looking for
it, Kelly Green caught my eye. I trim down the original pattern piece
so it will fit inside and slide it in to protect the orange paint.
I
sprinkle the white, black and third color (green) onto the tombstone;
estimating how much it will take to cover. How much of each color I
used depends on how dark or light or colorful I want to the tombstone
to be.
Now I drip the brush into clear water and spread the paints
blending them together using only vertical strokes.
A
small brush is needed to paint the inside side walls of the letters
and other holes.
Installation
If
you're wondering why I have such a heavy duty mounting system; it's
because every year, no matter which weekend I choose to put out my
graveyard, the next weekend a rainstorm with 55 mile per hour winds
hits. In 2015 there was even hail. I've seen far to may of these
tombstones shatter and fly away.
Lay
the tombstone on its back so its bottom is at the place you want the
tombstone to stand.
Pound the re-bars into the ground by lining them
up with the pipes in the tombstone.
Leave enough re-bar sticking out
of the ground to go almost all the way up into the tombstone. How
deep I pound them depends on the type of soil, the size of the
tombstone and the wind. I have sandy soil, large tombstones and
strong winds, so I go at least one and a half feet. However, I'm
careful because re-bar can be impossible to pull out of the ground if
it is pounded too far.
I
check to make sure the re-bar will not pop out the top of the
tombstone.
Then, I slide the tombstone over the re-bar making sure
they go up into the PVC and carefully press it all the way down to
the ground.
 Install the light and plug it in.
 Happy Halloween.
Materials
Styrofoam
this will be the tombstone front and sides
plywood
this will be the back
card
board or poster board or something a little bit firm but easy to cut
and fold
re-bar,
two pieces about 1 ½ feet longer than the height of the tombstone
PVC
pipe, two pieces about as long as the height of the tombstone
primer
paint; a
couple of different colors plus black and white, maybe a can of
matching spray paint
Mod
Podge
bolts,
nuts with washers x 4
bailing
wire or fishing string, or toothpicks
LED bulb
with electrical socket
Tools
pencil
or maker
scissors
Styrofoam
cutter: hot wire or knife
jigsaw
saw to
cut the re-bar; hacksaw
saw to
cut the PVC/; pipe cutter or hacksaw
paint
brush
razor
style knife
toothpicks
or stick pins
something
like a Popsicle stick
drill
and bits, including a 1” bit
Computer
with printer and a favorite font
screw
driver with an end that matches my bolts
paint
brushes; 2 inch and a small one
hammer
All content and information I present on this blog is intended for entertainment only and is presented “as is”, without claims or warranties of any kind, express or implied. I am not an expert of any kind; I just figure out how to make and create projects and I am willing to share that information. USE THIS INFORMATION AT YOUR OWN RISK! USE OF THIS INFORMATION CONSTITUTES AN AGREEMENT BY THE READER TO ASSUME ALL RISKS! The reader’s interpretation and application of this information shall be the reader’s sole responsibility. The reader agrees to hold harmless the author and publisher and therefore in no event shall the author or publisher be liable to the reader or any third party for any damages, claims, expenses or other costs; including, without limitation, legal fees arising from or in connection with the use of this information. The reader further agrees that their sole and exclusive remedy is to discontinue use of this information. I hold the copy right to the content if this blog and it may be used only with my permission. Your personal or contact information will not be shared with anyone, by me. I am not responsible for what the publisher or any of its partners do with your information. I reserve the right to change, close, sell or change the terms of use for this blog at any time. I am not responsible for any of the behavior or products presented by advertisers or sponsors in connection with this blog. If you wish to ask a question you may email me, however, I check my email about four times a year so a comment may work better. Please understand that any comments or emails sent become my property to use as desired.


